Tutorial: OpenCL SGEMM tuning for Kepler
Note: the complete source-code is available at GitHub.Note2: a tuned OpenCL BLAS library based on this tutorial is now available at GitHub.
Note3: a WebGL2 demo of this tutorial is available at: https://www.ibiblio.org/e-notes/webgl/gpu/mul/sgemm.htm.
Kernel 1: Naive implementation
Our first implementation is rather straightforward (and slow), but it gives us a good amount of parallelism and a nice starting point for further optimisations. We basically transform the two outer-loops over M and N (see the previous page) into two dimensions of parallel threads (named "work-items" in OpenCL).
// First naive implementation
__kernel void myGEMM1(const int M, const int N, const int K,
                      const __global float* A,
                      const __global float* B,
                      __global float* C) {

    // Thread identifiers
    const int globalRow = get_global_id(0); // Row ID of C (0..M)
    const int globalCol = get_global_id(1); // Col ID of C (0..N)

    // Compute a single element (loop over K)
    float acc = 0.0f;
    for (int k=0; k<K; k++) {
        acc += A[k*M + globalRow] * B[globalCol*K + k];
    }

    // Store the result
    C[globalCol*M + globalRow] = acc;
}
As you can see, the indices m and n of the loops over M and N have been replaced with the thread-identifiers globalRow and globalCol. To make this work, we'll have to make sure that the GPU executes this code M * N times. We can do this in the host-code (which runs on the CPU). Assuming you have already initialised OpenCL, created the appropriate buffers and memory copies, create a queue, and compiled the kernel code (see GitHub for an example or use this MWE), this is how you launch the above kernel:
kernel = clCreateKernel(program, "myGEMM1", &err)
err = clSetKernelArg(kernel, 0, sizeof(int), (void*)&M);
err = clSetKernelArg(kernel, 1, sizeof(int), (void*)&N);
err = clSetKernelArg(kernel, 2, sizeof(int), (void*)&K);
err = clSetKernelArg(kernel, 3, sizeof(cl_mem), (void*)&A);
err = clSetKernelArg(kernel, 4, sizeof(cl_mem), (void*)&B);
err = clSetKernelArg(kernel, 5, sizeof(cl_mem), (void*)&C);
const int TS = 32;
const size_t local[2] = { TS, TS };
const size_t global[2] = { M, N };
err = clEnqueueNDRangeKernel(queue, kernel, 2, NULL,
                             global, local, 0, NULL, &event);
err = clWaitForEvents(1, &event);
The order of M and N (and thus globalRow and globalCol in the kernel) is actually not a random choice. In fact, assigning the parallelism over M to threads in the first dimension (like we did) gives us much better performance. The reason is that subsequent threads (in the first dimension) now access subsequent data-elements of matrices A and C, allowing memory requests to be "coalesced" (grouped together in more efficient bursts). Accesses to B are un-coalesced independent of the order of M and N, since each thread requires subsequent elements of B themselves (an entire column). But don't worry, we'll fix that in the next version.
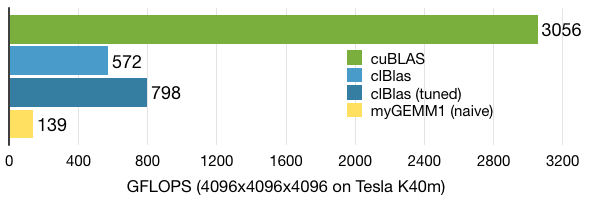
As expected, performance is not too great at 139 GFLOPS. But hey, this was only our first version.

